Getting Started on Savio
I made some notes as I was learning how to use Berkeley’s high-performance computing cluster (HPC) a couple of years ago. A few colleagues have asked for tips on getting started, so I’m publishing them here.
These notes are intended to help folks (e.g. me) who need to run large computing processes (e.g. that exceed the capacity of the average laptop) but who may not be super familiar with managing remote computing resources (e.g. high-performing clusters via Linux shells).
This is focused specifically on getting started with UC Berkeley’s HPC, which is called Savio, after Mario Savio, a major figure in the Berkeley Free Speech Movement. A lot of these insights may be transferrable to other slurm-based systems.
A lot of resources already document how to get set up and navigate Savio, but a lot of them are pretty verbose and may or may not be easy to follow for everyone. These notes are meant to consolidate and complement these resources, which are linked here:
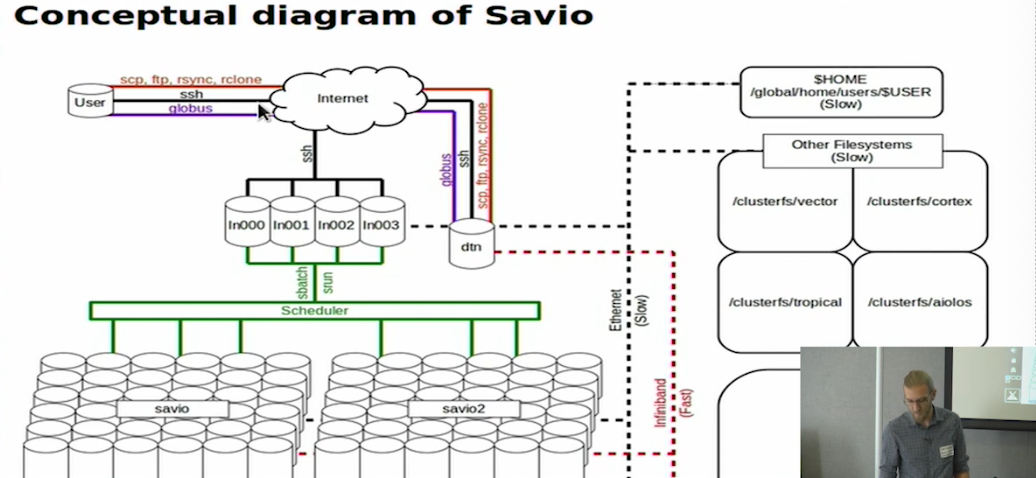
Overview
- Set up a user account through faculty, who have annual allocations of time on the cluster
- Access system through login node - main ssh tunnel
- From there, submit jobs via slurm scheduler to compute nodes for computation
- Also have data transfer nodes (DTN) - configured to facilitate transfer of large amounts of data
- Thru SSH, assigned to one of 4 login nodes randomly
- For file transfer, SSH to DTN (or use another protocol with DTN)
- 3 main file systems on Savio, every node has same access to all filesystems
- From login node, use Slurm scheduler - submit or request allocation of some amount of resources for some time, uses rules to assign those resources
- This sends the job to one or more partitions, which are called things like savio, savio3, savio2bigmem
- A partition is a pool of nodes (computers) within Savio
- Every machine within a given partition is configured the same way (i.e., savio2bigmem’s machines all have the same specs)
- But different partitions have different machine configurations (i.e., savio and savio3 specify different configs)
Account Set-Up
Identify a faculty member who has a SAVIO account and confirm with them it’s ok to request access to their “SAVIO cluster project”. For folks in Lara’s lab, her cluster project’s name is ‘fc_lmklab’. Request a user account via the myBRC site. You need to do this if you don’t already have an account with any SAVIO project OR if you maybe have access to another professor’s project and want to get access to a different one.
Once your account request is approved, you need to download and set up the Google Authenticator app on your phone. This will continuously generate the random 6-digit one-time passwords (OTPs) you will need to log onto SAVIO (every time). The instructions to do this and link it to your Berkeley account are pretty straight-forward and can be found here. (Scroll down to “Setting up One Time Password Authenticator”). At the end of this process you will have set a 4-digit PIN, or “token”, and should have Google Authenticator linked and generating 6-digit OTPs.
Logging In and Basic Navigation
Login
- Once you have your username, 4-digit PIN and OTP generator set up, open your Terminal (mac) or Command Prompt (windows) to remotely login to SAVIO via a secure shell, or ssh.
- SSH
ssh SAVIO_USERNAME@hpc.brc.berkeley.edu- password: personal pin followed by 1-time 6-digit pw from Google authenticator app
- drops you into home directory (
/global/home/users/SAVIO_USERNAMEor~) - terminal tells you which node you’re in (
ln001, e.g.) cd /global/scratch/username/- Once logged in, can switch to another login node:
ssh ln002, e.g.
File systems
- Two main, parallel file systems: home and scratch
- home: /global/home/users/[username]
- home dir limited to 10GB, limited to scripts, not for research data
- scratch: /global/scratch/users/[username]
- fast, for data storage
- anytime you do computation, use data you’ve stored in scratch
- architected for fast transfer to computing
- temporary » wiped after 180 days (supposedly, haha; I’ve had like 8 TB in there for 2 years now…)
Port-forwarding
- port forwarding allows use of GUI-type applications through SSH
ssh -Y- Say you want to run emacs or matlab. Rather than getting matlab within shell and having to do all your work on the command line, this will forward a remote application to interact with through your local machine
Node status
- Monitor node status with usual unix commands, e.g.
toporhtop- Tells you top processes running on login node
- If someone’s running a py process using 700% of cpu, problem - bogs everyone else down
- Once you have jobs running on other nodes (see ‘Computing’ below), you can monitor the status of jobs by temporarily ‘logging in’ to the node as a shadow shell user and running
toporhtopwithin the node - Find your job id(s) by running
squeue -u <yourusername> - Then,
srun --jobid=<your_job_id> --pty /bash
Data transfer
Data Transfer Node (DTN)
- BRC server dedicated to data transfer between NFS home directory and global scratch, or from remote storage at other sites to global scratch
- DTN server—NOT login nodes—should be used for large data transfers
- From login nodes:
ssh dtn.brc.berkeley.eduor more simplyssh dtn - Use Globus Connect from web for big file transfer (GridFTP)
- Globus endpoint name for DTN server is ucb#brc
- If data are stored in Drive or Box, can use rclone, but careful with configuration
Globus
- https://www.globus.org/
- Login with institutional login
- Set up 2-panel view
- Look for collection/endpoint
- Savio: ucb#brc
- Login with savio credentials
rclone
- Best to use rclone via a SPA account
- Set up a Google API client ID and client secret
- Configure rclone to interface with Drive using SPA account
- At the token configuration prompt, make sure to log in with the SPA account
- NB: you have to share relevant directories and data with the SPA account from main CalNet ID » rclone scans the contents of the SPA Drive so stuff has to be in there
SPA Account
- Use a SPA account for data security
- To access, first login to gMail native interface with CalNet credentials
- At CalNet auth screen, enter spa-spaname+yourcalnetid and typical CalNet pw
- e.g.: spa-eastriver+worsham, then typical calnet password for worsham
Transferring data with rclone
- BRC resource is the best guide
- Make sure you’re always working in DTN for data transfer - ssh before running rclone
- Try to do data transfers with bash scripts for replicability
- e.g. script for lidar data transfer
/global/home/users/worsham/rclone_copy_drive.sh
- e.g. script for lidar data transfer
- Use
nice -n $priorityto limit priority and not kill everyone else’s processes - Use
--bwlimit 8.15Mto get around Google’s 750GB daily transfer limit - Use nohup as a wrapper around everything else to keep rclone running in background in case terminal closes or times out:
nohup <... ARGUMENTS ...> &
Computing
- Use SLURM commands:
sbatchto submit jobs- Whenever you run sbatch, you’ll point it at a SLURM job script, a small file that specifies where and how you want to run your job on the cluster and what command(s) you want your job to execute.
sinfoto view list of nodessqto view job statusscancelto cancel jobs
Submitting jobs
- Create a job script file and point to it with slurm commands
- Options include things like:
- *Account: fc_lmklab
- *Partition:
- *Time limit:
- Quality of service:
- See the SAVIO user guide for proper syntax and formatting
NOTE: An important note on the use of SAVIO is that when you log in to a node for running a job, you are allocated all 24 CPUs on that node, even if your job doesn’t use all of them. Therefore, if you use 1 CPU on a node for 1 hour, you will still be charged for 24 “Service Units (SUs)”. Each SAVIO project has an annual budget of 300,000 free SUs. The way to use all CPUs on a node is to configure your job to compute in parallel.
Architecture
This graphic was sort of helpful once I understood the system a bit better.